WDX-180
Web Development X
Week 06 | CSS Frameworks & Intro to Programming

Week 06 - Day 1 | Introduction to Tailwind CSS
Schedule
Study Plan

What is a CSS Framework
A CSS framework is a prepped and ready-to-use CSS library (Cascading Style Sheets). The stylesheets collection makes the job of a UI developer easier.
Rather than starting every project from scratch, a CSS framework gives them tools to quickly create a user interface that they repeat and tweak during a project. They also enable the creation of more standards-compliant websites.
While quite challenging to use or ambiguous for beginners, senior developers who know the CSS framework sites’ descriptions and buzzwords find them extremely useful.
Why Do You Need A CSS Framework?
CSS frameworks are designed for use in typical scenarios such as establishing navigation bars, footers, sliders, hamburger menus, 3-column layouts, and more.
The frameworks also enable expanding on JavaScript, SASS, and other technologies. If designers are time-stressed, frameworks allow setting up web pages – not just homepages, without diving into some CSS.
Other than time-saving, teams comprising several developers benefit from the standards offered by CSS frameworks. Rather than each developer on a project adding their own style of names, frameworks regulate layouts, easily read others’ code, and smooth the development cycle with fewer bugs and better team communication.
All of the above are the two strongest pros of working with a CSS Framework: Faster Development and Consistency
However, as you already know, every coin has 2 sides. Using any CSS Framework can have it’s drawbacks and not be suitable for some cases as described below:
- Bloated Code
CSS frameworks include a lot of pre-built styles and components, which can add unnecessary code to a website or application. This can slow down the website’s loading time and negatively impact performance. Additionally, using pre-built components can limit the customization options available to developers and tempt developers to use them without fully understanding how they work.
- Learning Curve
Each CSS framework has its own set of styles, components, and conventions that developers need to learn in order to use it effectively. This can take time and effort, especially for developers who are new to front-end development. Additionally, CSS frameworks may not always align with a developer’s preferred workflow or coding style. This can make it challenging to use the framework effectively, especially if the developer is used to writing custom CSS from scratch.
How to use a CSS Framework
There are many different CSS Frameworks out there and they can be broken down to two categories:
-
Pre-styled, prescriptive, all-in-one frameworks (e.g. Bootstrap)
-
Hands-off, unopinionated, utility frameworks (e.g. TailwindCSS)
In later modules we’re going to dive deeper to each one of those two popular CSS frameworks, but first we must answer the one million dollar question: What type of Framework do we need?
To begin, we must have some knowledge of our website. Is it even necessary to have a system? Structures are beneficial to most locations with a large number of pages. The ideal amount of pages can change, but if we find ourselves repeating the same HTML, CSS, or even JavaScript on one of our pages, a layout or structure can help.
- Framework Language
We should be familiar with the computer language(s) that our framework employs. As previously stated, some simple frameworks are nothing more than basic HTML templates, while more complicated frameworks may include CSS and JavaScript. Some frameworks construct the CSS using LESS or SASS, while others utilize Ruby or other computer languages to compile the pages once they’re built. It will be challenging to build our framework if we are unfamiliar with the language(s) it employs.
- Framework Features
A CSS framework, often known as a web framework, is a collection of web-based tools, libraries, and best practices. A CSS framework can be as simple as a one-page template that serves as the foundation for all of our site’s pages, or it can be a complicated collection of CSS, HTML, JavaScript, and server-side programs and files that govern the entire site architecture.
- Whether the Framework is Customizable and Modular Customizable frameworks allow us to add our own code to make our site look unique and different from other websites. However, if a framework is overly customized, its benefits are lost, and it will be better to start from scratch.
After we’ve decided which type of Framework, and specifically which one we want to use, all we have to do it find their Official Documentation and follow their instructions! This can be scary for a new developer, but it can benefit us in the long run!
Tailwind CSS
-
Let’s start by watching this quick introduction to Tailwind in 100 seconds.
-
Watch this Tailwind CSS Introduction video by Dave Gray and follow along by coding and replicating the example he creates in the video. You will need to place all the files in the
user/week06/exercises/day01/tailwind_intro/folder. Make sure to create the folder if it doesn’t already exist. -
More practice with utility classes! Watch this video and code along. Place your file in the
user/week06/exercises/day01/utility_classes/folder. Make sure to create the folder if it doesn’t already exist.
Summary
CSS Frameworks are so popular these days and they get better and better as time goes by. However, just because they make things easier and faster for some cases, that does not mean that we should ditch plain CSS and restrain our options and imagination to what each CSS Framework has to offer.
Finally, it’s highly suggested that you take a look on the following link focused on Understanding the spectrum of CSS frameworks
Note:
You can have a look at this video if you’re time stressed, but the article mentioned above is worth reading!
Extra Resources
- Tailwind CSS Tutorial for Beginners (2023) (YouTube, 45min)
Sources and Attributions
-
Thanks to Mubashra Irshad for reviewing and suggesting the
Tailwind CSS Tutorial for Beginners.
Photo by SevenStorm JUHASZIMRUS
Week 06 - Day 2 | How to Make A Website With Tailwind CSS
Schedule
Study Plan

- Watch: How To Make A Website With Tailwind CSS
- Duration: 32min
- Level: Beginner
- Now, go through the video again, pause and code along. Below, you can find all the images needed to complete the tutorial (just click the links, then right click and select “Save Image as”):
You will need to create a repository named grocify under your GitHub account and enable GitHub Pages on that. Once you have finished recreating the website in the video, update the progress sheet with your GitHub repository’s Pages URL, that would look something like this: https://YOUR_USERNAME.github.io/grocify
While working with Tailwind CSS, it’s probably a good idea to install the following VSCode extension that will help you deal with the large list of utility classes provided by the library:
Exercises
- Complete the How to Make a Website with Tailwind CSS challenge and update the progress sheet.
IMPORTANT: Make sure to complete all the tasks found in the daily Progress Sheet and update the sheet accordingly. Once you’ve updated the sheet, don’t forget to commit and push. The progress draft sheet for this day is: /user/week06/progress/progress.draft.w06.d02.csv
You should NEVER update the draft sheets directly, but rather work on a copy of them according to the instructions found here.
Extra Resources
Week 06 - Day 3 | What is Programming?
Schedule
Study Plan
What is Programming?
Programming is communication. It’s also a lot of other things, but this introduction will focus on the different ways you communicate with your code.
When you write code you are really just writing a text document, exactly like you might write an email or a note. The biggest difference between an email and a computer program is who you are writing for.
When you write an email you’re writing for the person who will be reading it. When you write a computer program you are writing for 3 very different audiences at the same time! One single document (your code) needs to be understandable to:
- Developers: A developer needs to read your code and understand what you were trying to do and why.
- Computers: Your code needs to have perfect syntax so the computer can parse it, and you must write instructions that are allowed by the programming language or the computer will throw an error.
- Users: The instructions you give to the computer must create an intuitive and pleasant experience for the user.
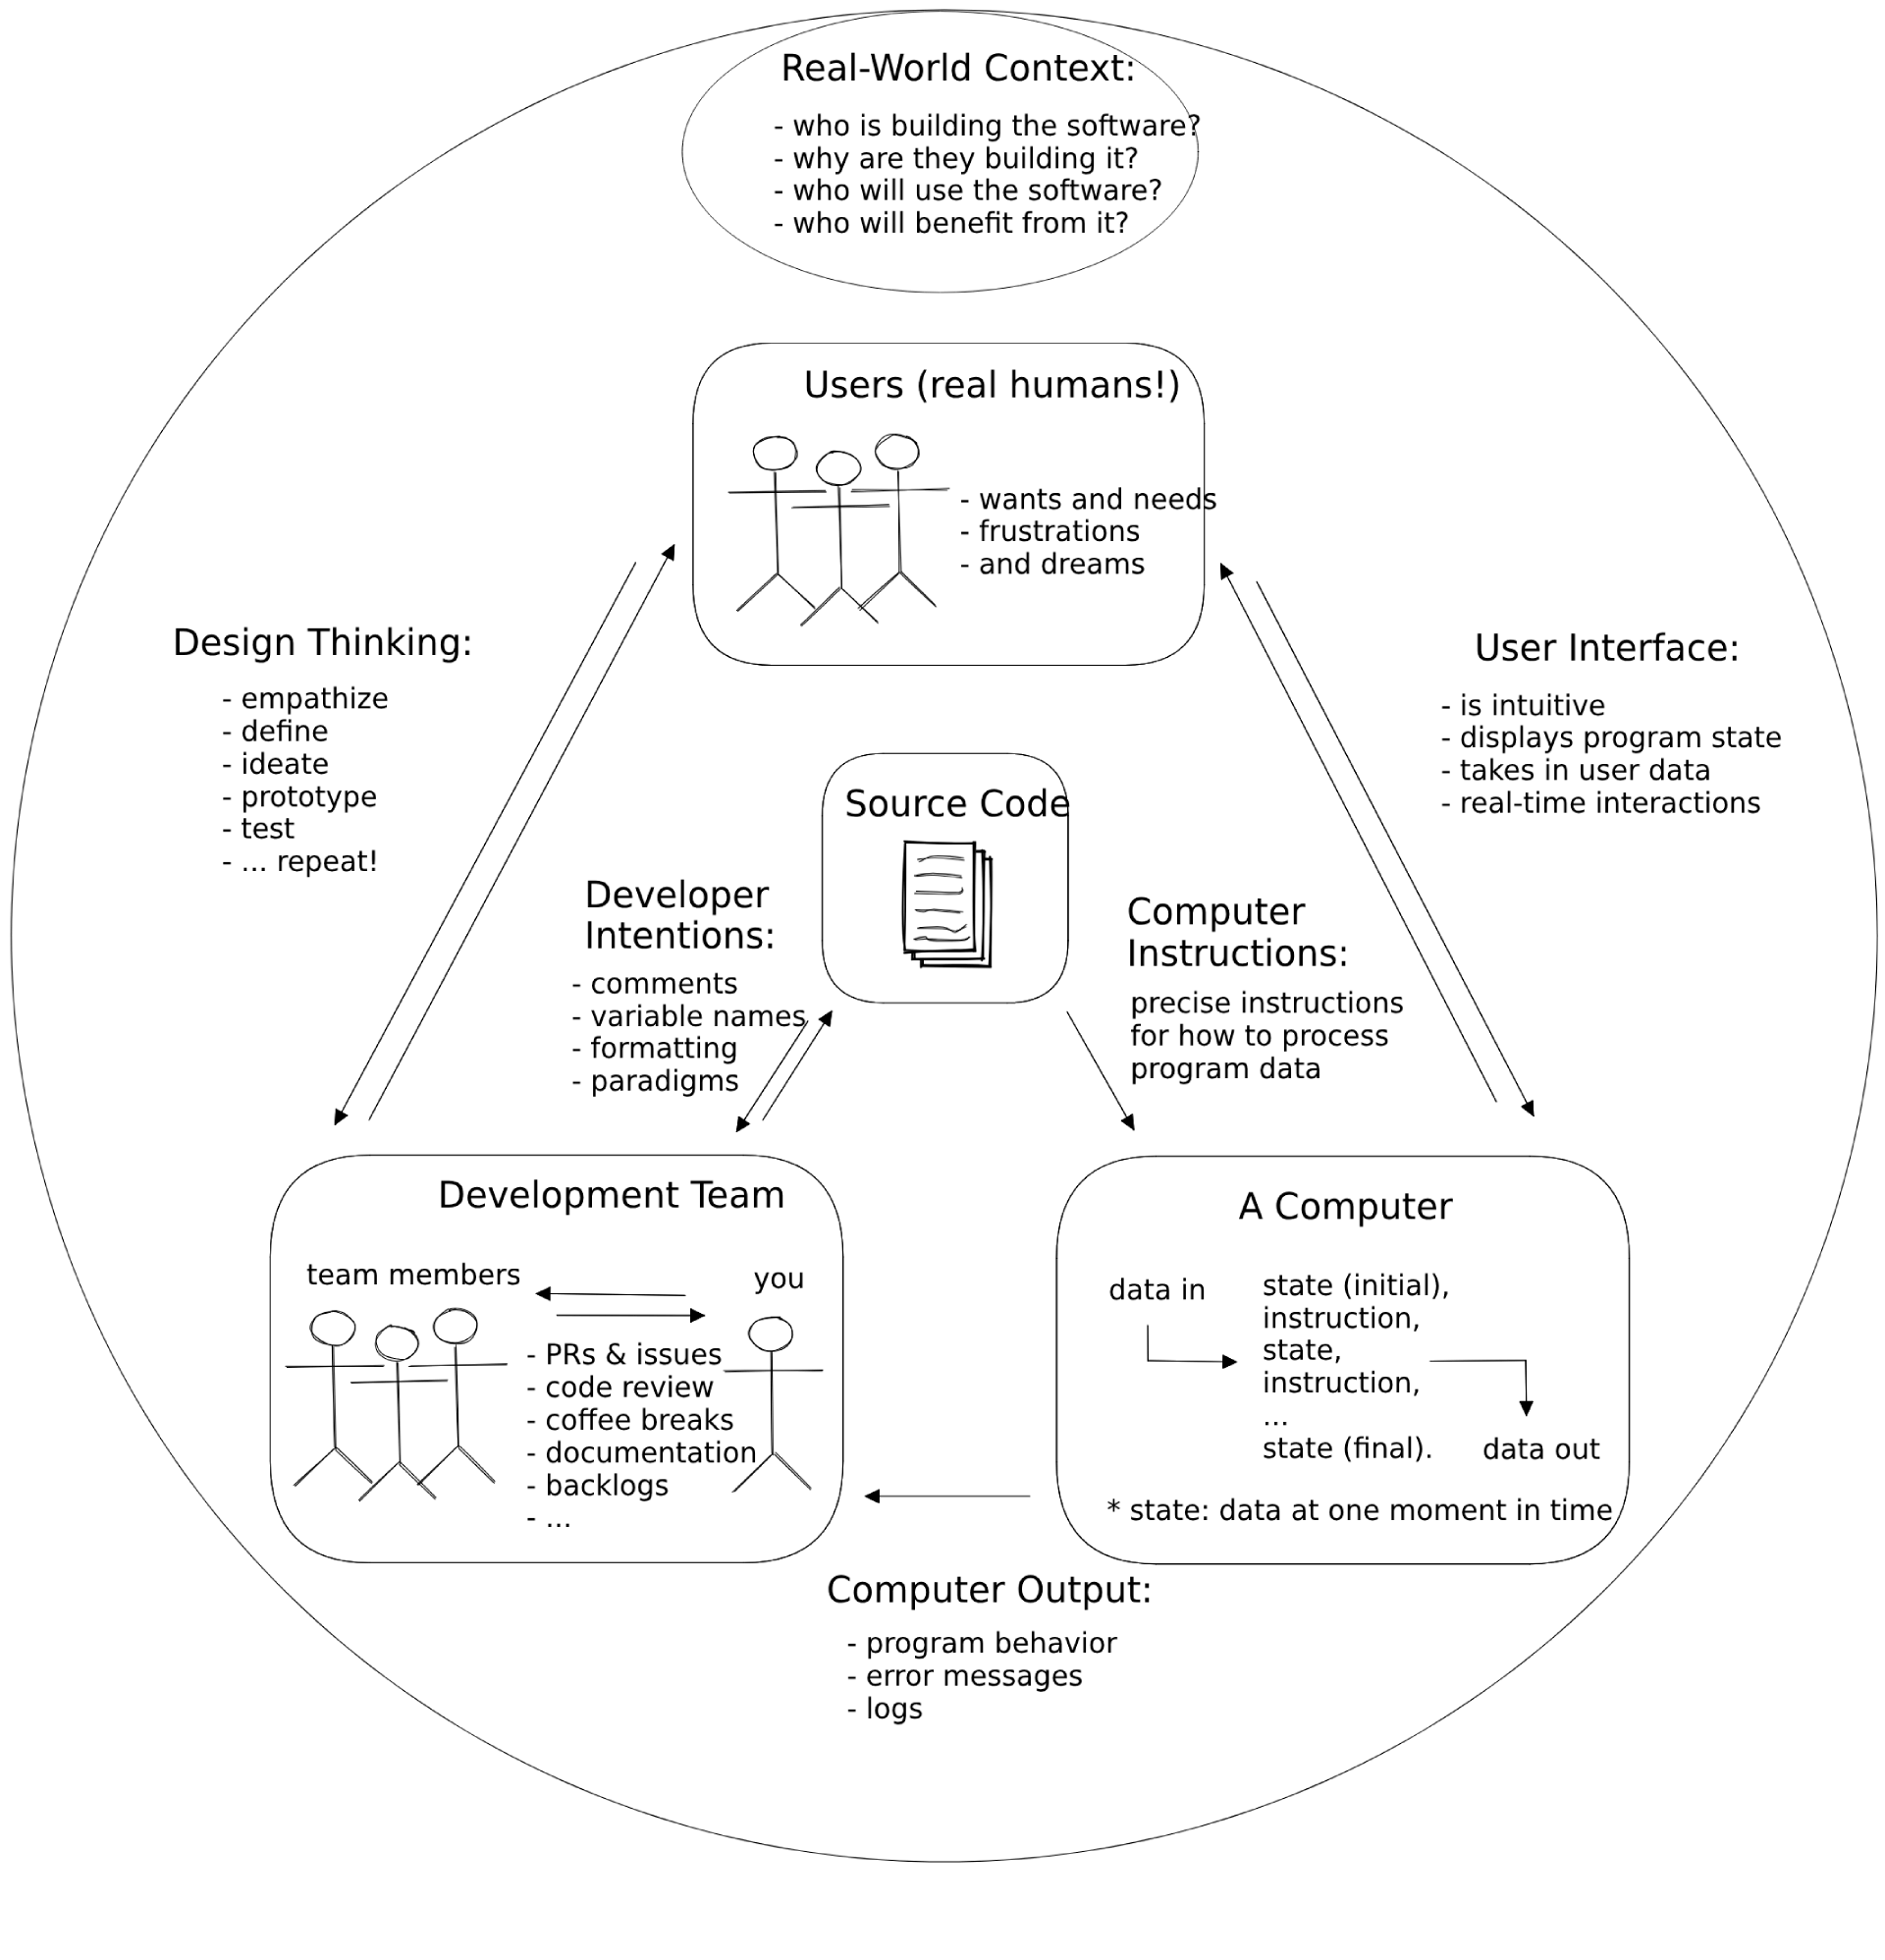
Being a developer means understanding how all these characters interact, and then communicating with everyone involved to deliver quality software within your project’s constraints. This diagram shows the different channels of communication in a software project:
Thinking like a Computer
In the following video, Evan Cole guides you through the basic concepts of programming and explains the feedback loop that continuously runs through the software cycle as source code is written by developers, subsequently read and executed by the computer which eventually displays the output back to the users.
- Watch: Thinking like a Computer
- Duration: 45min
- Level: Beginner
Programming Languages
High-level programming languages like JavaScript are a compromise between how people think and how a computer works. Programming languages are not always easy for people to learn but they’re definitely easier than directly telling a computer what to do (writing 1’s and 0’s).
Because humans are so much better at learning and understanding than computers are (for now), programming languages have been designed to leave all the hard work for us. It’s our job to make sure our instructions for the computer are perfectly structured and do exactly what we want. The computer just parses (interprets) our code and follows the instructions without any understanding or thinking.
You can think of a programming language as the developer’s UI for the computer. Because this UI isn’t very intuitive you will need to spend a lot of time studying syntax and other details before you can program with ease. This is why you will be focusing on understanding programs before writing them.
Learnable Programming said it best:
- Programming is a way of thinking, not a rote skill. Learning about “for” loops is not learning to program, any more than learning about pencils is learning to draw.
- People understand what they can see. If a programmer cannot see what a program is doing, she can’t understand it.
Thus, the goals of a programming system should be:
- to support and encourage powerful ways of thinking
- to enable programmers to see and understand the execution of their programs
…
How do we get people to understand programming?
We change programming. We turn it into something that’s understandable by people.
Until the future when computers are designed to understand us, we’re stuck with programming systems where we do the hard work of understanding computers.
Hopefully these Modules can make this journey easier.
Exercises
Installing Study Lenses
Follow the instructions from Setting up Study Lenses (v2) to set up Study Lenses (v2) on your System.
Watch a short introduction to Study Lenses
- Watch the WDX180 - Study Lenses Guide video to get familiar with the
study-lensestool that you’ll be using to study code and explore various aspects of JavaScript programs.- Duration: 12min
Running Study Lenses on WDX-180 material
Let’s now check whether study-lenses is available globally and try to use it to study a simple JavaScript program.
-
Open the terminal and stop any other instance of
study-lensesthat might be running, e.g. thenpm run test-contentfrom previous steps. You can pressCtrl+Con the terminal to stop the currently running process. -
Change to the following directory inside your local
WDX-180repo:cd curriculum/week06/exercises. -
Run
lenses2command on the terminal and check whether the app opens up in the browser. -
If the app opens up in the browser, click on the
hello-world.jsfile and start exploring some lenses likeflowchart,pseudo,variables,blanks,parsons, etc.
Give the Study Lenses repo a ⭐ Star!
- Visit the original repo and give it a star as a gesture of appreciation for the hard work that these guys have put to make this great open source learning tool.
IMPORTANT: Make sure to complete all the tasks found in the daily Progress Sheet and update the sheet accordingly. Once you’ve updated the sheet, don’t forget to commit and push. The progress draft sheet for this day is: /user/week06/progress/progress.draft.w06.d03.csv
You should NEVER update the draft sheets directly, but rather work on a copy of them according to the instructions found here.
Sources and Attributions
Week 06 - Day 4 | What is JavaScript?
Schedule
Study Plan
JavaScript
JavaScript is the only programming language supported by web browsers, this makes is a very common language. Every website that needs interactivity uses JavaScript alongside HTML & CSS. Because people across the world with all levels of programming experience are writing web pages, JavaScript has become something like the English of programming languages:
- It’s everywhere, most developers will know at least a little bit of JavaScript.
- It’s a messy and complicated language, full of exceptions and concepts borrowed from other languages.
- It’s easy enough to get started with the basics, and without too much experience you can already get your ideas across.
So why learn JavaScript? Because it’s quick to get started, you can do a lot with it, and there’s lots of work for a good JavaScript developer.
- Watch this short video where Brendan Eich, the creator of the language, explains JavaScript.
Running JavaScript
There are many ways you can run JavaScript, for now you should know about these options:
1. Writing directly in the console
This is closest to how you will be studying JS in this module.
Writing JS in your browser’s console is the simplest and quickest way to run some JavaScript, but is limited. It’s perfect for doing little experiments to see how something works, but it’s not possible to write and save a full program.
Try copy-pasting this code into your browser’s console and pressing “enter”
  /* --- for the computer --- */
  'use strict';

  /* --- for the developer --- */

  // log to the console for developers to read
  console.log('hello developer (console)');

  /* --- for the user --- */

  // alert hello for the user
  //  not a great UX, but easy to program
  //  you'll use this for now
  alert('hello user (alert)');
2. Writing directly in an HTML file
You can also write your code in a script tag of an HTML file then open the HTML
file in your browser. The JavaScript will run automatically when the page is
loaded. See this in action with ./assets/1-inline-script-tag.html.
You will learn about this later in the course for examples and exercises that introduce how JavaScript interacts with the DOM. It’s easier to understand “the big picture” when you can see everything in one document.
3. Loading JS files into HTML
You can also write your code in a separate .js file, then load the file into
your HTML to execute the code. There are two different ways you can load a .js file into your HTML, you can see them in action with ./assets/2-separate-script-file/index.html and ./assets/3-separate-module-files/index.html (you’ll learn more about scripts vs. modules later on).
You will use this for larger projects and for collaboration. Separating code into smaller files each with a clear purpose makes your code base easier to understand, debug, and to divide into group tasks.
4. Specialized Browser Environments
There are also many specialized environments for writing and running JavaScript in a browser, each one has a specific use case:
-
Study Lenses: This is an environment specialized for studying JavaScript locally with your text editor and a browser. It has features for understanding different aspects of code and for visualizing what happens during execution. The “run” and “debug” buttons in Study Lenses execute your code directly in the browser just like if you loaded a script into an HTML file. This will help you learn your browser’s DevTools and help you eventually transition away from the learning environment and towards professional devtools. (the material in this repo is written for Study Lenses)
-
Online IDEs: There are many online IDEs (Integrated Development Environments) designed for easy setup, collaboration, and sharing. Online IDEs try to match the developer experience of working on your local machine, but online. These are easy to use, but they’re not beginner toys! You can use these to develop full projects with a wide variety of programming languages, libraries and frameworks. Some popular ones are Repl.it, CodeSandbox, Codespaces or Glitch.
-
Online Learning Environments: There are also many online programming environments online designed for beginners that simplify the developer experience and allow you to focus on learning the basics without getting distracted by advanced features. Many of these come with built-in graphics libraries or support for game development. These include code.org (develop and play games with JS), editor.p5js.org (create interactive artwork), PencilCode (write your code as blocks or text).
5. Beyond the Browser
You can also use JavaScript outside of the browser to create web servers, develop mobile apps, program a Raspberry Pi, program IOT (Internet of Things) Devices, and much more.
Node.js is the most popular non-browser runtime for JavaScript. Deno is a newer runtime developed as a more secure and developer-friendly alternative to Node.js.
References
- javascript.info/intro
- The Net Ninja
- Andrew Mosh (first 5 minutes)
- MDN: First Steps
- Danielle Thé
Programs: Source Code
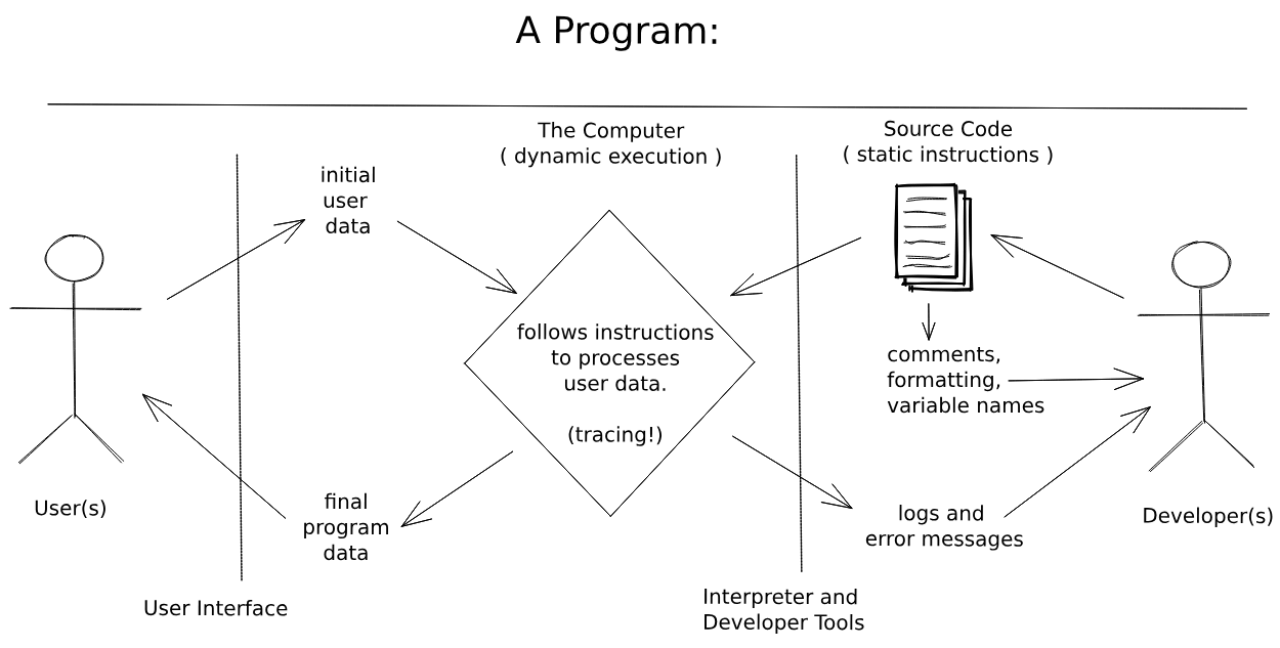
JavaScript is the language used to write the Source Code in this diagram:
Some History
JavaScript has an interesting history, it was originally created in 1 week during 1995 by Brendan Eich and since then has gone through many many changes.
At first it was just a small language used for small interactions in web pages. Over the years as the internet has grown and browsers have become more powerful, JavaScript has evolved from a small language for small interactions to a huge programming language capable of building complex applications.
As JavaScript grew, so did the number of developers who use it. All these developers pushed the limits of JavaScript, created new tooling, different conventions, and generally made the JS ecosystem a fascinating (and frustrating!) place to work. This human history of JavaScript is what makes it so interesting.
Backwards Compatibility
or “don’t break the internet!”
An important concept for understanding the JavaScript language is “Backwards Compatibility”. Backwards Compatibility means that any program ever written in JavaScript must always work!
Any time something is added to JavaScript or the language is changed in any way, older programs must still be valid JavaScript. This is important because people have been websites for decades now. It would be bad if one day every website written before 2003 no longer worked because of a recent change in JavaScript.
Imagine if every word, sentence, and grammar in your native language’s history needed to be understood by every native speaker for the rest of eternity! You would need to be just as comfortable reading a story written 4000 years ago as one written yesterday. This would make it very hard for languages to change and grow, but this is the case for JavaScript.
- You Don’t Know JS
- Why is JavaScript backwards compatible to a fault?
- tonsky.me
- rohitdhatrak
- Chrome Breaks the Web
ES6
ES6 was a new version of JavaScript released in 2015, it contained major changes to the language that improved the developer experience. ES6 marked such a large change in JavaScript that it’s fair to talk about the JS world before ES6 and after ES6 as different eras.
You can learn more about ES6 another time, for now you just need to know it was such a big improvement that it belongs in every history of JS.
The Future of JavaScript
All new features for the JavaScript language are presented and discussed in the tc39 github organization. If you’re curious looking through the proposals repository can be interesting to see how people plan and discuss additions to the JS language.
Developers
Developers are the ones designing the software, writing the code, and fixing the bugs. As a developer you’ll spend lots of time reading source code. So it’s very important to make sure your code is easy to understand.
You should think first of other developers who will need to understand your program, and second of yourself. Why is this more productive? First because working on a team is easier when everyone is looking out for each other. Second because one day you’ll be someone else! After even half an hour your thoughts about a program are no longer fresh, you’ll need to rely on what you wrote to figure out the details of your own program.
Programs: Developers
Users and on the left in this diagram, developers are on the right.
- For Developers
- Static: Comments, variable names and code formatting help developers read and understand source code.
- Dynamic: Logs and error messages help developers understand what is
happening inside the computer as it follows the code’s instructions.
The Computer
You’ve been the user of many websites, you’ve even developed a few with HTML & CSS, but you haven’t had to be the computer yet. With HTML & CSS it’s enough to learn what goes in and what comes out, you don’t need to know what happens in between:
- HTML/CSS goes into a browser -> … ? … -> a website is displayed
With JavaScript it’s the complete opposite. What the program does (inputs -> outputs) is less important than how it happens. Your goal now isn’t to amaze the user, it’s to become the computer and understand what happens between the input and the output:
- source code -> a lot of important steps -> final output
Computer Empathy
A program is just a series of instructions. If you follow the instructions exactly like the computer would, you are actually running the program by hand! (just a lot slower.) There is no difference in theory between you following the code’s instructions and a computer following the same instructions.
So when you practice tracing think of it as building your computer empathy: understanding what it’s like to be the computer as it runs your program. If the first rule in design is “know your user”, then one of the first rule in coding should be “know your computer”. After all, the computer is one of your code’s users!
Predict, not Explain
So what does it mean to “know JavaScript”? How do you know when you’ve understood some code? When you can predict exactly what will happen at each step of execution!
Explaining a program in plain english is helpful but it’s easy to be a little bit wrong and not know it. When you focus on predicting what happens at each step and you check your predictions with a trace or JS Tutor, then you really know if you understood.
This approach is also helpful because not only will you know if you’re right, but if you’re wrong the computer will tell you the right answer! Then you know exactly which line you didn’t understand, and you know what to study next.
Programs: The Computer
The computer is in the center of this diagram. It interpreting the developers source code, processing the user’s data, and logging information for the developer.
Tracing code is a very good way to begin understanding how the computer follows
your instructions one step at a time:
Users
Users will use your running programs, but will never see your source code. When writing for a user you need to think of their needs and their experience using your program.
For now the user experience of your programs will be limited to pop-up boxes, but that doesn’t mean you can’t think of UX (User Experience). A user always appreciates clear instructions, helpful feedback and a friendly tone in your messages.
How does thinking of a user help you write code that they will never see? It’s about keeping the big picture in mind and making priorities. It’s easy to get caught up in the details of your code, taking a step back to remember who you’re developing for and why they need this program keeps your priorities in perspective.
Programs: Users
Users and on the left in this diagram, developers are on the right.
- For Users
- Inputting Data:
promptis a simple way for users to input data to a JavaScript program. - Outputting Data:
alertis a simple way for the computer to display data to a user.
- Inputting Data:
Data In, Data Out: I/O
So what is a program? It’s something like this:
The basic job of a computer program is to process data. Even the most beautiful and interactive programs are just processing data behind the scenes. One of the biggest tricks to programming is figuring out how to model your problem using data so computer can help you solve the problem.
The programs you’ll be studying in this module are focused on processing text data (“strings” in JavaScript). This is a good place to start because you are already used to reading and working with text so it shouldn’t be too hard to understand what’s happening inside the computer:
- The user inputs some text data into a pop-up.
- The program processes the data. (tracing!)
- Some new data is displayed to the user in a pop-up.
Later on you’ll learn how to make better user interfaces than just a pop-up, but the main idea will remain the same: The user interface is just a human-friendly way for the user to interact with your program, the actual program is running behind the scenes processing their data and producing new data.
JavaScript Strings
What is data? In the simplest sense, data is just information. This information can be represented or stored in many different ways. JavaScript has several data types, the one that matters most for now are strings. Strings are how JavaScript stores and manipulates text:
  'use strict';

  // strings are any text wrapped in quotation marks

  console.log('this is a string');

  // you can check type of some data using `typeof`
  //  you'll learn a lot more about this later
  //  for now just know that it's possible
  console.log(typeof 'hello'); // "string"
  console.log(typeof 5); // "number"
  console.log(typeof '5'); // "string

  // you can find the length of a string with `.length`
  console.log('abc'.length); // 3
  console.log('ab'.length); // 2
  console.log('a'.length); // 1
  console.log(''.length); // 0

  // string concatenation:
  //  you can combine two strings using concatenation
  console.log('a' + 'b' + 'c'); // 'abc'
You don’t need to understand very much about JavaScript types for now, just that the programs in this folder are all processing text data represented in JavaScript by strings.
Programs to Study
A very important skill to learn as a programmer is not being afraid of code you don’t understand. There is always something you can understand and there is always a way to understand the rest. You aren’t expected understand all the syntax in this folder just yet.
Instead focus on what you can understand about each program at a higher level, like in the diagram at the top of this README. For all of these examples and exercises try running the program many times inputting different data and seeing what comes out.
Exercises
Explore Study Lenses
Continue your exploration of the study-lenses tool. Follow the instructions here to set up Study Lenses (v2) on your System (if you haven’t done that already).
Then the following commands on your local copy of the WDX-180 repo:
lenses2 curriculum/week06/exercises/exploring-study-lenses
Once the study-lenses is up and running on your browser, click on the README.md link to open up the slides. Browse through the slides (using the left and right arrow keys on your keyboard or just by pressing space), click on the load buttons to load the file and follow the study guide on each of them.
Explore these with your team.
Practice Program Explaining
Practice explaining what is happening in each program using these terms:
- Program Behavior: You can answer these questions just by comparing inputs
and outputs! You don’t need to read a single line of code:
- What does the program do?
- What happens to the user data, how is it transformed or processed in the program?
- Data In: What data does the program expect? Try to say this in a normal human sentence.
- Data Out: What data does the program expect? Try to say this in a normal human sentence.
- Test Cases: Specific examples of data that goes in and the data that comes out.
In the curriculum/week06/assets/examples/ folder you will find a few programs with a comment describing the behavior, data in and data out. Your challenge in curriculum/week06/exercises/practice_explaining/ is to fill in the same information for new programs.
Be very careful about your formatting! Study the example comments closely and do your best to format yours exactly the same:
  'use strict';

  /* Program Title

    Description of program's behavior.

    Data In:
      Describe the data that goes in.

    Data Out:
      Describe the data that comes out.

    Test Cases:
      'an example input' -> 'the matching output'
      'another input' -> 'the other output'
      ...

  */

  // ... the rest of the code
IMPORTANT: Make sure to complete all the tasks found in the daily Progress Sheet and update the sheet accordingly. Once you’ve updated the sheet, don’t forget to commit and push. The progress draft sheet for this day is: /user/week06/progress/progress.draft.w06.d04.csv
You should NEVER update the draft sheets directly, but rather work on a copy of them according to the instructions found here.
Extra Resources
Sources and Attributions
Week 06 - Day 5 | Predictive Stepping
Schedule
Study Plan
Predictive Stepping: Practice predicting each step of program execution, using your browser’s debugger to check your predictions every step of the way.
In order to follow the material, you will need to install and use the study-lenses tool. Follow the instructions from Setting up Study Lenses (v2) to set up Study Lenses (v2) on your System (if you haven’t done that already).
Launching Study Lenses and following the material
Once lenses2 is properly installed on your system, clone the repository that contains the study material on your system and run lenses2 to go follow the material:
git clone git@github.com:in-tech-gration/predictive-stepping.gitcd predictive-stepping-
lenses2 - Watch: Predictive Stepping (Part 1)
- Duration: 50min
- Level: Beginner
- Watch: Predictive Stepping & Debugging (Part 2)
- Duration: 55min
- Level: Beginner
Use the study material found here and work on the exercises.
Weekly feedback: Hey, it’s really important for us to know how your experience with the course has been so far, so don’t forget to fill in and submit your mandatory feedback form before the day ends. Thanks you!