WDX-180
Web Development X
Authorization, Roles & Permissions
Deciding What Users Are Allowed To Do
Authentication answers:
“Who are you?”
Authorization answers:
“What can you do?”
Yesterday we built:
  Login
  Logout
  Sessions
Now every user can log in.
That’s progress.
Unfortunately:
  Every logged-in user
  can still do everything.
That’s less ideal.
Imagine:
Intern
accidentally deleting:
Entire Product Catalog
because they found the delete button. 🙀
Today we’ll build a permission system that prevents that.
Learning Objectives
By the end of this lesson, students will be able to:
- Understand authorization
- Implement user roles
- Restrict route access
- Build authorization middleware
- Understand role hierarchies
- Hide unauthorized UI elements
- Prevent privilege escalation
- Understand ownership-based permissions
- Design scalable permission systems
Part 1 — Authentication vs Authorization
Yesterday:
Are you logged in?
Today:
What are you allowed to do?
Example:
| User | Login | Delete Products |
|---|---|---|
| Admin | Yes | Yes |
| Editor | Yes | No |
| Viewer | Yes | No |
Authentication alone is insufficient.
Authorization completes the picture.
Part 2 — The Simplest Role System
Add:
  ALTER TABLE users

  ADD COLUMN role TEXT
  DEFAULT 'viewer';
Update your db/setup.js script and re-initialize the Database in order to test the new authorization rules we are about to implement.
Possible values:
  admin
  editor
  viewer
Example:
  admin@example.com

  admin
  editor@example.com

  editor
  viewer@example.com

  viewer
Update db/setup.js and create 2 new users with an admin and editor role, just to experiment with different permissions.
Part 3 — Loading User Information
Currently:
req.session.userId
stores only ID.
Load user via a Middleware:
  app.use(function provideUserInfo( req, res, next ){
    if ( req.session.userId) {
        req.user = userRepository.findById(req.session.userId);
    }
    next();
  });
Now:
req.user
contains:
  {
      id: 1,
      email: 'admin@example.com',
      role: 'admin'
  }
Very useful.
This information will be available throughout our Backend so that we can check if the user is logged in and whether they have the appropriate permissions based on their role.
Part 4 — Creating Authorization Middleware
Authentication middleware:
requireAuth()
Authorization middleware:
requireRole()
Example:
  function requireRole(role) {
      return ( req, res, next ) => {
          if (!req.user) {
              return res.redirect('/login');
          }

          if (req.user.role !== role) {
              return res
                  .status(403)
                  .render('403', { title: "403" });
          }
          next();
      };
  }

  module.exports = { requireRole }
You can store the requireRole middleware somewhere in an auth folder, export it and import it where needed: auth/index.js.
Make sure to create the appropriate view views/403.ejs:
  <h1>403</h1>
  <p>Forbidden</p>
Usage:
  const { requireRole } = require("./auth/index.js");

  app.get('/admin', requireRole('admin'), (req,res) => {
        ...
  });
Only admins allowed.
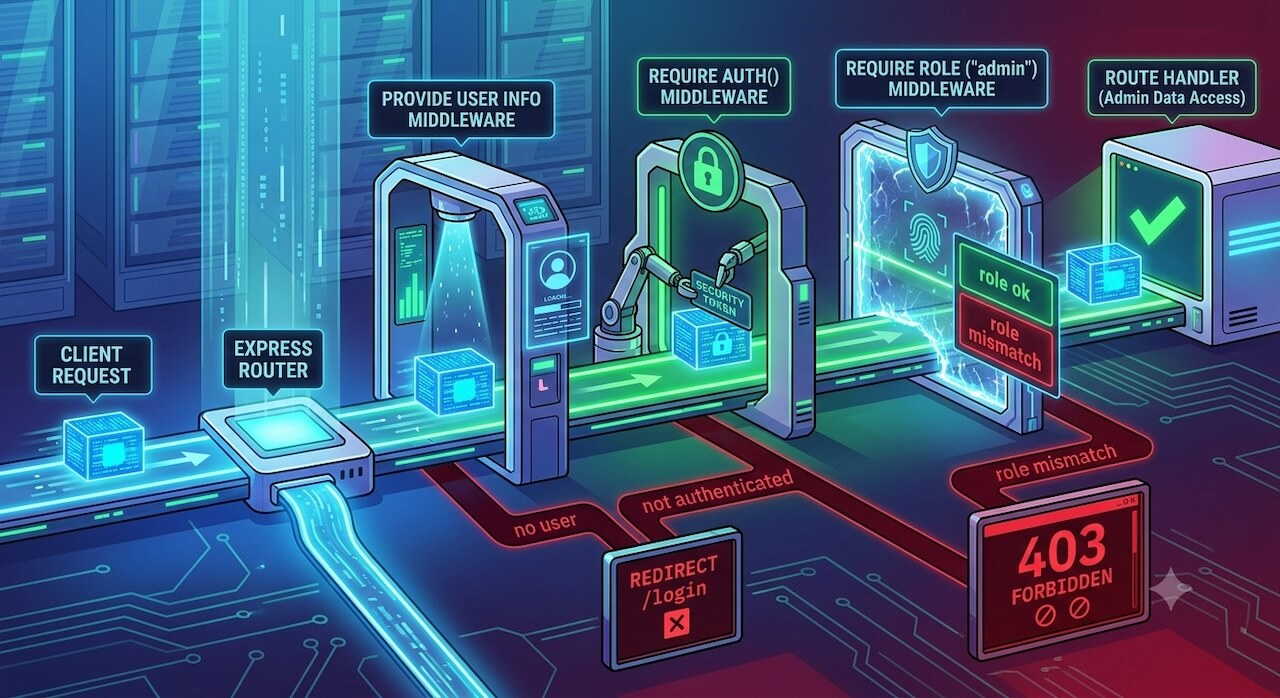
Here’s how the Authentication and Authorization architecture with Express middleware works in our application:
  flowchart LR
      A[Client Request] --> B[Express Router]
      B --> C[provideUserInfo middleware]
      C --> D["requireAuth() middleware"]
      D --> E["requireRole('admin') middleware"]
      E --> F[Route Handler]
      C -->|no user| G[redirect /login]
      D -->|not authenticated| G
      E -->|role mismatch| H[403 Forbidden]
      E -->|role ok| F
Part 5 — Understanding HTTP 403
Authentication failure:
401 Unauthorized
or redirect.
Authorization failure:
403 Forbidden
Meaning:
  We know who you are.

  You are not allowed here.
Important distinction.
Perhaps, it’s a good time now to create a 401.ejs file as well inside the views folder.
Part 6 — Protecting CRUD Operations
Question:
Should viewers create products?
Probably not.
Example:
| Action | Admin | Editor | Viewer |
|---|---|---|---|
| View Products | ✓ | ✓ | ✓ |
| Create Product | ✓ | ✓ | ✗ |
| Edit Product | ✓ | ✓ | ✗ |
| Delete Product | ✓ | ✗ | ✗ |
Routes:
router.post('/delete/:id', requireRole('admin'), ...);
Editors cannot delete products.
Admins can.
Part 7 — Role Hierarchies
Current:
role === 'admin'
works.
But:
admin
should automatically inherit:
  editor
  viewer
permissions.
Hierarchy:
  admin

    ↓

  editor

    ↓

  viewer
Represent numerically:
  const roles = {
      viewer: 1,
      editor: 2,
      admin: 3
  };
Middleware:
  if (roles[req.user.role] < roles[requiredRole]) {
      return res
          .status(403)
          .render('403', { title: "Forbidden" });
  }
Much more flexible.
Part 8 — Hiding UI Elements
Bad:
Delete Product
visible to everyone.
Even if route is protected.
Better:
  <% if ( user.role === 'admin') { %>
    <a>Delete</a>
  <% } %>
Users only see actions they can perform.
Important:
UI hiding ≠ Security
Routes must still be protected.
Always.
You can use the res.locals object to provide data access to your views:
  // Through a Middleware:
  app.use(( req, res, next )=>{
    res.locals.userRole = "admin";
  })

  // Through a Route
  app.get("/", (req, res )=>{
    res.locals.customData = { value: 42 };
  });
And, now you can access them from the .ejs files:
  <% if ( customData ) { %>
    Custom data: <%= customData.value %>
  <% } %>
You can now implement a Middleware that lets the views access the userRole and conditionally display the Delete and Edit buttons throughout the Product screens.
Part 9 — Ownership-Based Permissions
Roles aren’t always enough.
Example:
User A
creates:
Product A
Question:
Can:
User B
edit it?
Maybe not.
Add to the Database Schema:
created_by INTEGER
to products.
Create:
created_by = req.user.id
Check ownership:
  if ( product.created_by !== req.user.id ) {
      return res
          .status(403)
          .render('403', { title: "Forbidden" });
  }
Very common pattern.
Part 10 — Combining Roles and Ownership
Example:
Admins
can edit everything.
Editors
can edit their own.
Logic:
const canEdit = req.user.role === 'admin' || product.created_by === req.user.id;
Real-world applications often combine both approaches.
Part 11 — Avoiding Privilege Escalation
Dangerous:
  <select name="role">
    <option>admin</option>
  </select>
User submits:
role=admin
Congratulations.
They promoted themselves.
Never trust:
Client Input
for permissions.
Server decides permissions.
Always.
Part 12 — Centralizing Permissions
❌ Bad:
if ( admin )
everywhere.
Eventually:
  100 routes

  50 permission checks
becomes chaos.
Create:
permissions.js
Example:
  module.exports = {
      canDeleteProduct(user) {
          return ( user.role === 'admin');
      }
  };
Cleaner.
Reusable.
Testable.
Part 13 — Building an Admin Dashboard
Protected route:
  app.get('/admin', requireRole('admin'),(req,res) => {
    res.render('admin', { title: "Admin Dashboard" });
  });
Only administrators see:
  System Settings

  User Management

  Audit Logs
A common application architecture.
Part 14 — Future Permission Models
Simple roles work well.
Eventually systems grow.
Example:
  Create Product

  Delete Product

  Manage Users

  Publish Content

  View Analytics
Instead of:
role
store:
permissions
Schema:
  permissions

  roles

  role_permissions
This becomes:
Role-Based Access Control
commonly called:
RBAC
Used by:
- GitHub
- Jira
- Notion
- Shopify
- Countless enterprise systems
Check out this video and this one to learn more about the RBAC and the more advanced (but extremely flexible and useful) ABAC. These are various ways to define permissions in a Software application.
Part 15 — Security Philosophy
❌ Never assume:
Hidden Button = Security
Attackers can call:
POST /products/delete/5
directly.
Always validate permissions On The Server!
Every protected action.
Every time.
No exceptions.
Common Beginner Mistakes
Protecting UI But Not Routes
Bad:
Hide Delete Button
Attackers can still call:
POST /delete
directly.
Trusting Role Values From Forms
Never.
Duplicating Permission Logic
Centralize it.
Hardcoding Admin IDs
Bad:
if(user.id === 1)
Use roles.
Forgetting Ownership
Sometimes:
User owns content
matters more than role.
Assignment
1) Add:
role
column to users.
2) Implement:
requireRole()
middleware.
3)
Restrict:
Delete Product
to admins.
4)
Hide:
Delete Button
for non-admins.
and
Edit Button
for viewers and guests (non-logged-in users).
5)
Create:
  401.ejs
  403.ejs
error pages.
Bonus Challenge
Add:
created_by
column to products.
When creating:
created_by = req.user.id
Allow:
Admins
to edit all products.
Allow:
Editors
to edit only products they created.
Reject all others.
You have now implemented the foundations of content ownership used by many professional CMS platforms.
Key Takeaways
Today you learned:
- Authorization
- Roles
- Permissions
- Ownership
- 403 responses
- Permission middleware
- Role hierarchies
- Privilege escalation risks
- RBAC fundamentals
The CMS now understands not only who users are, but also what they are allowed to do. This is one of the most important transitions from a simple application to a multi-user system suitable for real organizations.
⚠️ A large part of the content of this module was created using Generative AI (ChatGPT). The synthetic (AI-generated) content was reviewed and curated by Kostas Minaidis.