WDX-180
Web Development X
Authentication & Login Systems
Knowing Who the User Is
CRUD applications manage data.
Real applications manage people.
Up until now, anyone can:
  Create Products
  Edit Products
  Delete Products
  Upload Images
This is convenient.
It’s also a complete security disaster.
Today we introduce:
Authentication
the process of verifying who a user is.
This is the beginning of turning our CMS into a multi-user application.
Learning Objectives
By the end of this lesson, students will be able to:
- Understand authentication fundamentals
- Understand sessions
- Understand cookies
- Build login forms
- Hash passwords securely
- Verify user credentials
- Create authenticated sessions
- Protect routes
- Implement logout functionality
- Understand common authentication vulnerabilities
Part 1 — Authentication vs Authorization
These terms are often confused.
Authentication
Answers:
Who are you?
Example:
  Email
  Password
Authorization
Answers:
What are you allowed to do?
Example:
  Admin
  Editor
  Viewer
Diagram:
  flowchart LR

  A[Login]

  A --> B[Authentication]

  B --> C[Authorization]
Today focuses on:
Authentication
Part 2 — Why Passwords Must Never Be Stored Directly
❌ Bad:
  email

  password
Stored:
  admin@example.com

  supersecret123
Database leak:
All passwords exposed
Very bad.
Password Hashing
Instead:
supersecret123
becomes:
$2b$10$...
This process is called:
Hashing
Important:
Hashes are one-way
You can verify them.
You cannot reverse them.
Watch this short video to better understand password hashing.
Part 3 — Introducing bcrypt
Most Express applications use:
bcrypt
Install:
npm install bcrypt
Import:
const bcrypt = require('bcrypt');
Hash password:
const hash = await bcrypt.hash(password, 10);
Example result:
$2b$10$...
Store:
Hash
not:
Password
Let’s see an example of hashing a password and then verifying it:
  // REGISTRATION
  const user = "Ada";
  const password = "1234";
  const hash = await bcrypt.hash(password, 10);
  // At this state, we should save the hash to the Database
  // and connect it with user 'Ada'

  // LOGIN
  const userInput = "Ada";
  let userPass = "1234";
  const result = await bcrypt.compare(userPass, hash);
  // result is true in this case, since stored hash and hash created from userPass match.

  userPass = "123";
  const notAMatch = await bcrypt.compare(userPass, hash);
  // Since the input password "123" is different from "1234", the comparison will fail.
Part 4 — Creating a Users Table
Schema:
  CREATE TABLE users (
      id INTEGER PRIMARY KEY,
      email TEXT UNIQUE,
      password_hash TEXT
  );
The UNIQUE constraint will ensure that no new user can be registered with an email that already exists in the database.
Example:
  admin@example.com

  $2b$10$...
No plaintext passwords.
Ever.
Part 5 — Creating the First User
Example:
const hash = await bcrypt.hash('secret123', 10);
Insert:
  INSERT INTO users (
      email,
      password_hash
  )
  VALUES (?, ?)
Store:
  admin@example.com

  hashed password
You can update the database seeding script to create 3 sample user accounts just to play around:
  // CREATE 3 SAMPLE USERS:
  db.exec(`
    INSERT INTO users (email, password_hash)
    VALUES
    ('user1@example.com', '$2b$10$GFfVuIolc8j.qa0qGTWUJuxt/aYgAS0aoQzwIyFlwne0Hl7DtmTwO'),
    ('user2@example.com', '$2b$10$aV4wATg2lRM1VpvuOAZT3ORuMMWI/BJf5bQ.F1sCH.cFp98dhfht.'),
    ('user3@example.com', '$2b$10$TOSxG1AFzCKZBMhGqrf8L.sS9SdgxDUwZ6BCVFUUY8AWDTcuC/x3W');
  `);
The 3 hashed passwords correspond to:
$2b$10$GFfVuIolc8j.qa0qGTWUJuxt/aYgAS0aoQzwIyFlwne0Hl7DtmTwO->password1$2b$10$aV4wATg2lRM1VpvuOAZT3ORuMMWI/BJf5bQ.F1sCH.cFp98dhfht.->password2$2b$10$TOSxG1AFzCKZBMhGqrf8L.sS9SdgxDUwZ6BCVFUUY8AWDTcuC/x3W->password3
Part 6 — Building the Login Form
View: views/login.ejs:
  <h2>Login</h2>
  <form method="post" action="/login">
      <input type="email" name="email">
      <input type="password" name="password">
      <button>Login</button>
  </form>
Update /index.js:
  app.get('/login', ( req, res )=>{
    res.render("login", {
      title: "Login"
    })
  });
Simple.
Professional.
Familiar.
Part 7 — Verifying Credentials
Create a file db/userRepository.js:
  const db = require('./db');

  function findByEmail(email) {
    const stmt = db.prepare(`
        SELECT *
        FROM users
        WHERE email = ?
      `);

    const result = stmt.get(email);
    return result;
  }

  module.exports = {
    findByEmail,
  };
Route (/index.js):
  const userRepository = require("./db/userRepository");

  // ...

  app.post('/login', async (req, res) => {

    const { email, password } = req.body;
    // Lookup user:
    const user = userRepository.findByEmail(email);

    if ( !user ){
      return res.send("User not found");
    }

    // Verify password:
    const valid = await bcrypt.compare(password, user.password_hash);

    // Invalid credentials
    if ( !valid ){
      return res.send("Unauthorized access");
    }
    // Login succeeds.
    res.send("Logged in successfully");

  });
Part 8 — Sessions
After login:
How does the server remember the user?
Good question 🤔
Answer:
Sessions
Without sessions:
  Login
  Refresh
  Logged Out
Not ideal.
Part 9 — Introducing express-session
Install:
express-session
npm install express-session
Configure (/index.js):
  const session = require('express-session');
  const { loadEnvFile } = require('node:process');
  loadEnvFile();

  // Use Session Middleware:
  app.use(
      session({
          secret: process.env.SESSION_SECRET,
          resave: false,
          saveUninitialized: false
      })
  );
Now:
req.session
exists. Make sure to console.log it and ensure that it has been correctly enabled.
In order to set up process.env.SESSION_SECRET, you can create a .env file in the root of your project with the following content:
SESSION_SECRET=your_secret_key_here
(Just make sure to use a safe secret key)
Part 10 — Creating a Session
Successful login:
req.session.userId = user.id;
Example:
req.session.userId = 1;
Server remembers:
User #1
between requests.
Let’s update the POST /login route and set the session once the user has logged in successfully:
  app.post('/login', async (req, res) => {
    // Login succeeds.
    req.session.userId = user.id;
    res.send("Logged in successfully");
  });
Check the req.session through a console.log after you have successfully logged in to ensure that everything works find up to this point.
Part 11 — Cookies
Sessions require cookies.
Browser receives:
session-id
Future requests:
session-id
returned automatically.
Diagram:
  flowchart LR

  A[Browser]

  B[Cookie]

  C[Server Session]

  A --> B
  B --> C
  C --> B
  B --> A
The browser stores:
Session Identifier
not user data.
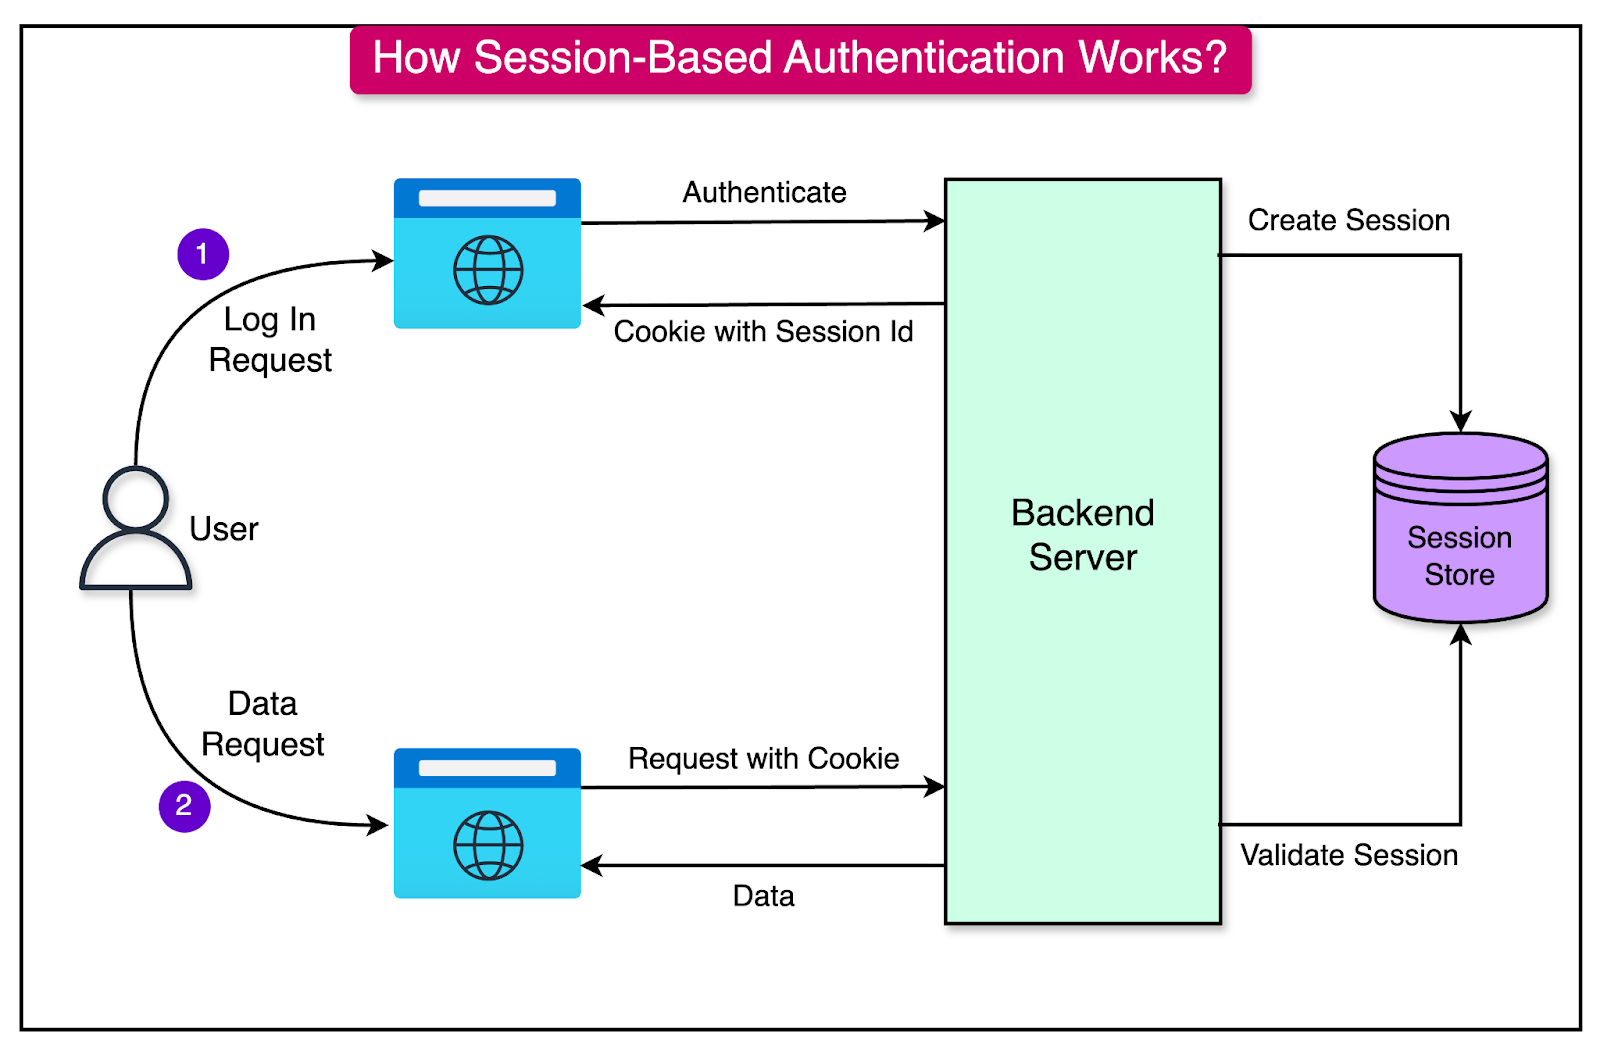
(Diagram from ByteByteGo)
Part 12 — Protecting Routes
Current:
/products/create
accessible by everyone.
Middleware (that will act as a protection layer):
  function requireAuth( req, res, next ) {
      if ( !req.session.userId ) {
          return res.redirect( '/login' );
      }
      next();
  }
Usage:
  router.get('/create',
      requireAuth,
      (req,res) => {
          ...
      }
  );
Now login is required.
Part 13 — Logout
Create a new route (/index.js):
  app.get('/logout', (req,res) => {
    req.session.destroy(() => { // Destroy Session...
      res.redirect('/login'); // ...then redirect user to the Login page
    });
    }
  );
Session removed.
User logged out.
Simple.
We just need to implement a button for the Logout now.
And it would also be nice to provide a confirmation before logging out.
Part 14 — Displaying User Information
Middleware (/index.js):
  app.use((req,res,next) => {
    res.locals.userId = req.session.userId;
    next();
  });
View (/views/layout.ejs):
  <nav>
    <% if ( userId ) { %>
      Logged In
      <a href="/logout">Logout</a>
    <% } else { %>
      Logged out
      <a href="/login">Login</a>
    <% } %>
  </nav>
Navigation can now adapt.
Part 15 — Common Authentication Attacks
Plaintext Password Storage
Never.
Weak Passwords
❌ Bad:
123456
❌ Bad:
password
❌ Bad:
qwerty
Session Hijacking
Protect with:
httpOnly: true
cookies.
Brute Force Attacks
Eventually implement:
Rate Limiting
User Enumeration
❌ Bad:
Email not found
versus:
Wrong password
✅ Better:
Invalid credentials
for both.
Part 16 — Why Authentication Matters
Without authentication:
Anyone edits everything
With authentication:
Users identified
Soon we’ll add:
  Roles
  Permissions
  Ownership
which build on today’s foundation.
Common Beginner Mistakes
Storing Passwords Directly
Never.
Use bcrypt (password hashing).
Creating Your Own Hashing Algorithm
Don’t.
Use established libraries.
Trusting Cookies
Always verify sessions server-side.
Forgetting Logout
Sessions should be removable.
Protecting Only Frontend Pages
Backend routes must also enforce authentication.
Always.
Bonus Challenge
Create:
/register
page.
Workflow:
  Email
  Password
  Confirm Password
  Hash password.
  Create account.
  Automatically log user in.
  Redirect:
  /products
Warning: Make sure to stop users from registering an account with an email that already exists. This is where SQL Constraints protect the integrity of our Database.
Also, don’t forget to handle the error cases where a use might try to register with an email that already exists. Gracefully handle the error and provide a good User eXperience to the user while not revealing too much sensitive information. For example, Error registering user might be a safer bet than Email already exists.
Key Takeaways
Congratulations! You’ve just built the foundation of nearly every web application that exists.
Today you learned:
- Authentication
- Password hashing
- bcrypt
- Sessions
- Cookies
- Login workflows
- Logout workflows
- Route protection
- Authentication middleware
- Security fundamentals
This is a major milestone. The CMS is no longer just a data management tool—it now understands users. That opens the door to permissions, roles, ownership, administration panels, and multi-user workflows that are common in professional web applications.
⚠️ A large part of the content of this module was created using Generative AI (ChatGPT). The synthetic (AI-generated) content was reviewed and curated by Kostas Minaidis.